
Crystal Ball Inner Engraving Guide
Crystal ball inner engraving is different from engraving flat or rectangular crystal. Because the surface of a crystal ball is curved, light refraction can affect laser propagation and focusing. Using a transparent liquid to immerse the crystal ball can help reduce the optical effects caused by the curved surface and provide more stable engraving results.
This guide provides a general reference procedure for crystal ball inner engraving with the WeCreat Lumos Ultra UV.
Note:
WeCreat currently does not provide a dedicated Crystal Ball engraving mode, nor do we provide crystal balls, dedicated crystal ball fixtures, or inner-engraving liquids and other related accessories. The following procedure is provided as a general reference only. Actual results may vary depending on the crystal ball, its dimensions, the liquid used, the 3D model, and the engraving parameters.
1. Prepare the Crystal Ball and Container
Prepare a transparent crystal ball and a transparent, flat-bottomed container of a suitable size.
We recommend using a high-quality transparent K9 crystal ball and measuring its actual diameter before engraving.
The container should be large enough to fully accommodate the crystal ball and allow the ball to remain stable after the liquid is added.
Clean the crystal ball and container before use to remove dust, oil, or other contaminants that could affect laser transmission.
2. Secure the Crystal Ball
Place the crystal ball in the center of the container and make sure it cannot move, roll, or wobble during engraving.
If necessary, prepare a suitable fixing method according to the size of the crystal ball.
Any movement of the crystal ball during engraving may cause the engraving position to shift or the final image to become distorted.
3. Add a Transparent Refractive-Index-Matching Liquid
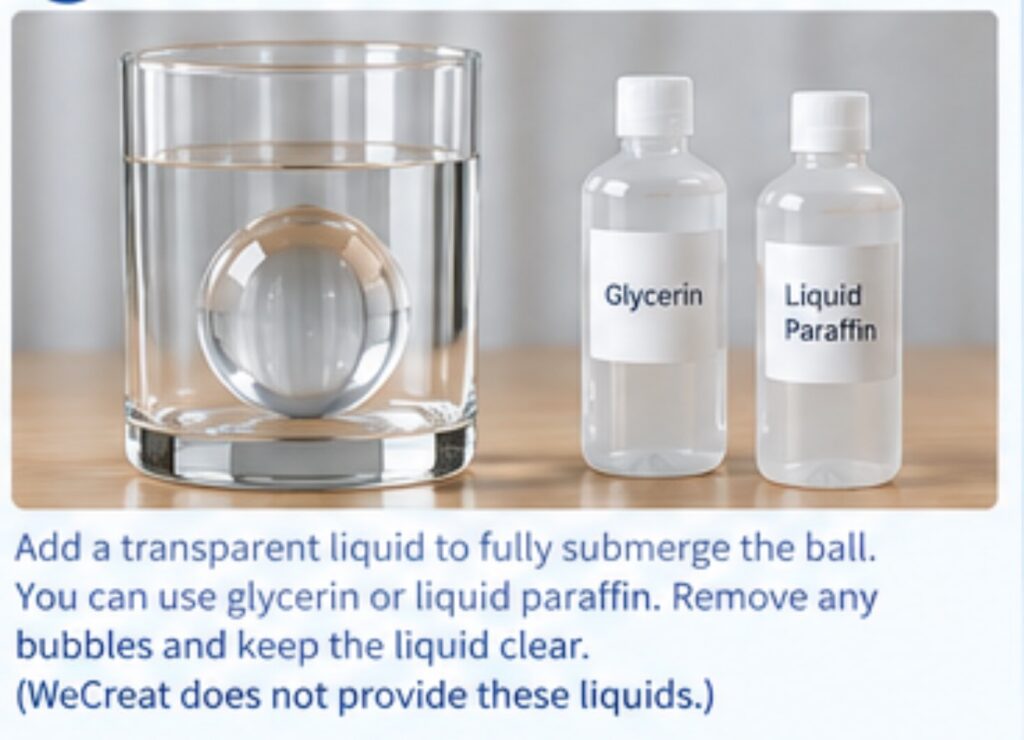
Place the crystal ball inside the container and add a transparent liquid until the crystal ball is completely immersed.
You may consider trying:
- Glycerin
- Liquid Paraffin
These liquids can be used as reference options for refractive-index matching in crystal ball engraving.
After adding the liquid, carefully check the surface of the crystal ball and the surrounding area for air bubbles.
If bubbles are present, allow the setup to stand until the bubbles have dissipated before starting the engraving process.
Important:
The liquid should be as clear as possible and free of bubbles, dust, or other contaminants that could interfere with laser transmission.
4. Position the Crystal Ball in the Machine
Place the container with the crystal ball and liquid securely in the working area.
Make sure the bottom of the container is stable and remains level.
The crystal ball should remain stationary throughout the engraving process. Avoid movement caused by machine vibration, liquid movement, or an unstable setup.
5. Configure 3D Material Size in MakeIt
Import the 3D model you want to engrave into MakeIt.
MakeIt currently does not have a dedicated Crystal Ball mode. Therefore, use the Cylinder mode under 3D Material Size to define the engraving area for the crystal ball.
In the 3D Material Size settings:
- Select Cylinder.
- Set the cylinder diameter according to the actual diameter of the crystal ball.
- Set the appropriate height based on the actual dimensions of the crystal ball.
- Make sure the 3D model is positioned appropriately within the defined engraving area.
The Cylinder setting is used to define the 3D material area in the software. It does not mean that the crystal ball itself is cylindrical.
6. Adjust the 3D Model
After importing the 3D model, adjust its size and position according to the dimensions of the crystal ball.
For the initial test, we recommend keeping the model relatively small and positioning the main engraving content near the center of the crystal ball.
Because the crystal ball has a curved surface, optical refraction can have a greater effect toward the outer areas of the ball. Therefore, when high detail is required, starting with a smaller model positioned near the center is recommended.
7. Set the Engraving Parameters
Configure the engraving parameters according to the actual crystal ball being used.
Different laser systems have different optical systems, engraving algorithms, and scanning methods. Therefore, parameters used successfully on another brand of laser engraver cannot necessarily be applied directly to the Lumos Ultra.
The following parameters may need to be adjusted based on the actual engraving results:
- DPI
- Power
- Speed
- Frequency
- Other relevant engraving parameters
If you encounter insufficient engraving detail, you can try gradually increasing the DPI, for example, to above 1000 DPI, and compare the results at different settings.
We recommend adjusting parameters gradually and using test engravings to determine the appropriate parameter range for the specific crystal ball.
8. Perform a Test Engraving
Before engraving the final project, we recommend performing a test engraving first.
You can use a smaller 3D model or a simple test pattern and check:
- Whether the engraving points are clear
- Whether the 3D structure is properly reproduced
- Whether the edges of the model appear blurry
- Whether sufficient engraving detail is achieved
- Whether there is a noticeable difference between the center and outer areas of the crystal ball
If the test result is not satisfactory, adjust the DPI, power, speed, or other relevant parameters based on the actual result.
9. Start the Final Engraving
Once the crystal ball is securely positioned, the liquid is free of obvious bubbles, and all software settings have been configured, you can start the engraving process.
Do not move the container, crystal ball, or other components during engraving.
Always follow the applicable laser safety requirements when operating the machine.
10. Clean the Crystal Ball After Engraving
After the engraving is complete, carefully remove the crystal ball from the container.
Remove the liquid from the surface of the crystal ball and clean the surface using an appropriate method.
Finally, inspect the engraving from different angles to evaluate the internal 3D details and overall result.
Frequently Asked Questions
Why can’t a crystal ball be engraved in the same way as a regular K9 crystal?
A regular rectangular crystal has relatively flat surfaces, while a crystal ball has a curved surface. When the laser enters a spherical object, refraction can significantly affect laser propagation and focusing.
As a result, using the same focus and processing settings as those used for regular crystal may affect the engraving position, clarity, and detail.
Immersing the crystal ball in a transparent refractive-index-matching liquid can help improve the optical conditions as the laser enters the crystal.
Why should I use Cylinder mode?
MakeIt currently does not have a dedicated Crystal Ball mode.
Therefore, use Cylinder mode under 3D Material Size to define the engraving area. Set the Cylinder dimensions according to the actual diameter and height of the crystal ball, and position the 3D model appropriately within the defined area.
Why don’t parameters from another laser engraver work well?
Different laser engravers use different laser sources, optical systems, scanning methods, and software algorithms.
Therefore, even if a specific crystal ball and 3D model produce excellent results on another laser engraver, the same parameters may not produce the same results on the Lumos Ultra.
We recommend testing and optimizing the parameters specifically for the crystal ball and Lumos Ultra being used.
Does WeCreat provide crystal balls or related accessories?
Currently, WeCreat does not provide crystal balls, dedicated crystal ball fixtures, glycerin, liquid paraffin, or other accessories specifically intended for crystal ball inner engraving.
Users will need to prepare a suitable crystal ball, container, fixing method, and appropriate transparent refractive-index-matching liquid separately.